Linux Kernel Compilation and Adding a Custom System Call
by Ali Raza
Prerequisites
Please make sure you have a good amount of free space. As for Virtual Machines, people were having issues when they allocated only 20GB of storage space. So at least allocate 50GBs to avoid the issues.
Install the following packages before moving to next step:
sudo apt install gcc make bc build-essential libelf-dev libssl-dev bison flex initramfs-tools git-core libncurses5-dev dwarves zstd
Now you can follow these steps. First of all, we’ll compile the kernel and test it’s running. Then we’ll add our custom system call.
Compiling Linux Kernel
Step 1: Downloading source code and extracting
Download the kernel file from www.kernel.org i would recommend downloading Linux Kernel 5.3.7 Or above version because the method of adding system calls described here is for kernel 5.3.7 or above.
For simplicity you can download from this direct link (Kernel 5.10.117):
https://cdn.kernel.org/pub/linux/kernel/v5.x/linux-5.10.117.tar.xz
if you are looking to download any other version, for simplicity you will need to download tarball file, as shown in the picture bellow.
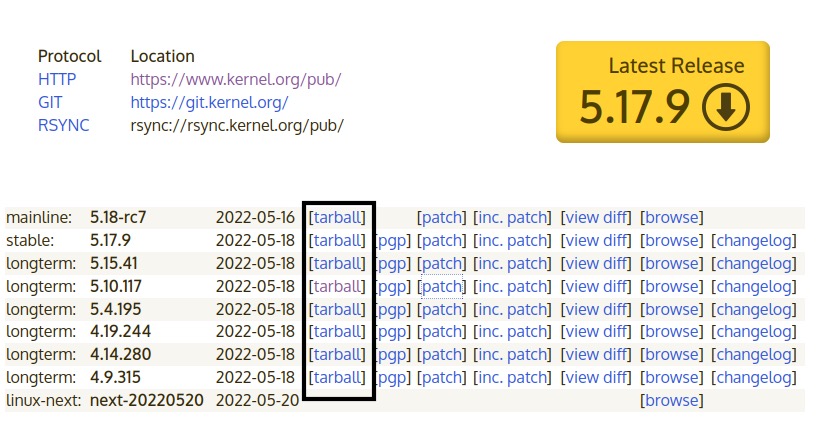
When you have downloaded the archive file linux-5.x.x.tar.xz, you need to extract the file in some directory.
tar xvf linux-5.x.x.tar.xz #use correct file name
cd linux-5.x.x.tar.xz
Now you are in the directory of kernel files you can verify by list file using ls command.

Step 3: Configuration
Now you need to configure your flavor of the kernel. Configuring the kernel involves selecting which features you want to build into the kernel image, which features you want to build as loadable modules, and which features you want to omit entirely. The configure process will finally create a .config script for building the kernel. The .config file contains the configuration information (which has information about the features to be installed) of the kernel to be compiled.
There are different methods to configure the Linux kernel, but we’ll go with the old configuration of the currently running kernel. Here we’ll copy the old configurations form /boot/config-x.x.x-x-generic and we’ll create a new .config in our kernel’s directory.
like
cp /boot/config-5.13.0-40-generic ./.config
Now in this .config file, we need to make some changes.
- Open the .config file in vim.
- Search for
CONFIG_SYSTEM_TRUSTED_KEYSand assign an empty string to it (i.e, double quotes"") - Search for
CONFIG_SYSTEM_REVOCATION_KEYSand assign an empty string to it (i.e, double quotes"")
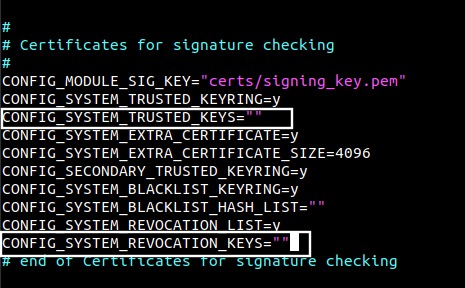
- Now save the file and quit.
:wq!
Now run the following command to configure:
yes '' | make oldconfig # it may take some time
Till now you have made the configuration. But still, you need to distinguish your kernel from other versions. To do so, Open Makefile present in the kernel’s root directory and change the variable EXTRAVERSION with some name like this:
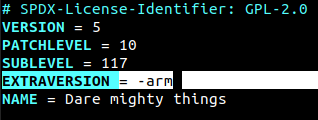
Now to make a copy of the kernel release, run the following command:
make kernelrelease # after success a kernel release will be printed like 5.10.117-arm
Step 4: Compiling the modules
Now it’s time to build/compile the kernel modules.
To do so you can you the following commands:
make -j $(nproc) bzImage # nproc gives the number of your system's cores. and by this command, I am using all of my system's cores to make this process faster

# after the success of the above command, run the following command.

make -j $(nproc) modules
Step 5: Installing modules
Till now your kernel release has been compiled. Now to install the modules, use the following command. You need to be sudoer for the installation process.
sudo make INSTALL_MOD_STRIP=1 modules_install

# INSTALL_MOD_STRIP=1 will reduce the size of the modules before installing them.
This step will take just a second and create a new directory /lib/modules/5.10.117-arm/ and copy all the .ko files (modules) over there.
Step 6: Installing kernel
Now run the following command to install the custom kernel.
sudo make install
The install section of Makefile will move the files to their destination locations mentioned in the DIR variables (in the Makefile like BIN_DIR, MAN_DIR, BIN_DIR_D, …). Instead of using mv or cp command the install target of Makefile uses a Linux install command that not only moves files but also changes permissions to those files.
Step 6: Updating the grub
Till now your kernel has been compiled and installed. But still, we need to update the grub boot loader in order to boot our system from the custom kernel. For that, we need to increase the booting selection process in order to select our kernel. To do so open the file
/etc/default/grub in vim and change the GRUB_TIMEOUT value from 5 to 30.
Moreover, let the GRUB_DEFAULT value to 0, which means by default boot from the first entry of the kernel in the /boot/grub/grub.cfg file, which will be the newly installed kernel.
After making these changes you need to update the boot loader using the following command:
sudo update-grub2
This will update GRUB with the new kernel. And if it is the latest kernel version then it will become the default to be loaded when rebooting. Otherwise, we need to select the kernel to run during the booting process explicitly. To open the boot loader, restart the system, during system startup hold the shift key and you will see a screen with all installed kernels.
Congratulations your kernel is ready to boot.
Restart your system in order to boot from the new kernel.
sudo systemctl reboot
Adding system call
Till now we have compiled and installed our configured Linux kernel release. Now it’s time to make actual changes in the kernel source code to have the motivation that we are actually making changes to the kernel.
For this time we’ll add only our custom hello world system call.
Step 1: Writing the systemcall code (.c file)
- Create a c file in which you’ll define your system call. As for now, we are adding a just hello world system call, so use these c files.
mkdir my_syscall # create this directory inside the linux source root directory
cd my_syscall
touch hello_world.c
- Add the following code snippet as this is your custom system call code.

#include <linux/kernel.h>
#include <linux/syscalls.h>

SYSCALL_DEFINE0(hello_world)
{
 printk("Hello Ali. This is me, your custom system call.\n");
 // printk will print to the kernel log. do see the man page for more details
 return 0;
}
- Create a
Makefileinside your systems call directory and add the following line in it.
vim Makefile
obj-y := hello_world.o
Step 2: Adding the header
Till now we have designed our system call. Now we need to add and link this system call with our kernel.
vim include/linux/syscalls.h

# add this line at the end of the file just above #endif
asmlinkage long sys_hello_world (void);
We need to link our system call with the kernel’s syscalls header. To do so add the following line at the end of include/linux/syscalls.h
Step 3
Now we need to register our system call in the syscall table to get a unique system call number. For this open arch/x86/entry/syscalls/syscall_64.tbl
vim arch/x86/entry/syscalls/syscall_64.tbl
Add the following entry at the end of the file where the last system call is registered.
For simplicity, I have used 696 number for my system call.
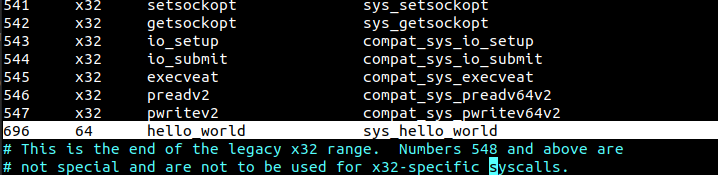
696 64 hello_world sys_hello_world
Step 4
Now we need to add our system call’s directory in the kernel source Makefile.
Open the Makefile and search for the core-y entry.
At the end of this line, add the system call’s directory after a space and a / at the end of the line. For simplicity see the following picture.
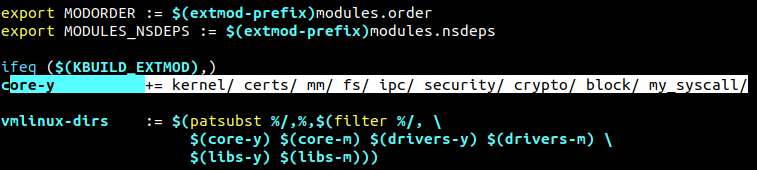
core-y += kernel/ certs/ mm/ fs/ ipc/ security/ crypto/ block/ my_syscall/
Step 5
Now we need to recompile and install our kernel in order to test this system call.
make -j $(nproc)
sudo make install
Use the following command to reboot and hold the shift key to select your custom kernel.
sudo systemctl reboot
Step 6
Now it’s time to test you changes that you have made with your own kernel release i.e, testing system call.
Write a driver program anywhere in the system and test your system call.
#include <stdio.h>
#include <unistd.h>
#include <sys/syscall.h>

int
main(){
 long rv = syscall(696); // 696 is my system call's number
 if(rv == -1){ // it means no system call found with provided syscll number
 printf("error\n");
 return -1;
 }
 return 0;
}
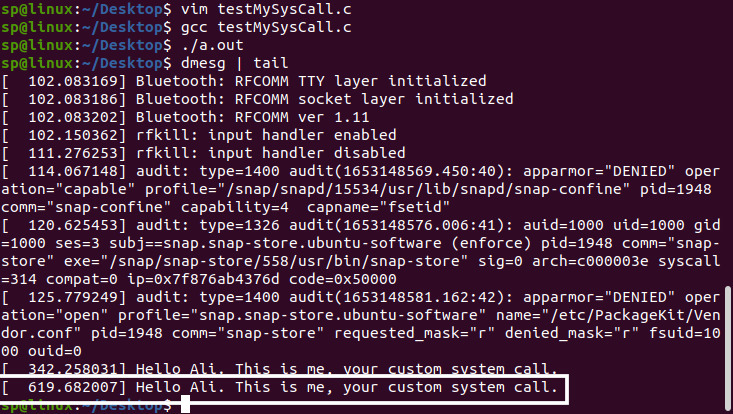
Since I have used printk to write output on the kernel log file, so it won’t be printed on the shell/terminal. To check the kernel log, use dmesg and bound it to see the last entries after running the driver program. You’ll find your system call’s output. Which means your system call is working.
Yes, you did it.
Writing a wrapper function
Till we successfully added and tested our system call on our custom kernel release. Now we need to write a wrapper function for our system call. One of the advantages of doing so is that we do not need to remember the syscall number in syscall.
Step 1: Write a wrapper function in c file
You need to create a c file and then write a wrapper function in that file. I have created greetings.c
#include <sys/syscall.h>
#include <stdio.h>
#include <unistd.h>

#define SYSCALLNO 696

int hello(const char* name){
 printf("Hello %s!\nYour message is displayed on kernel log.\nYou can use dmesg to read it.\n\nThanks me later.\n",name);
 long rv = syscall(SYSCALLNO);
 if (rv == -1){
 fprintf(stderr,"Error: Syacal Not found :(\n");
 }
 return rv;
}
Now, here I have a recommendation that you can create a position-independent code (PIC) and create a dynamic library.
for that you need to compile your code using the following command:
gcc -c -fPIC greetings.c
Now create a dynamic library with famous command.
gcc -shared greetings.o -o libgreetings.so
Now you have libgreetings.so dynamic library. You can add this library to LD_LIBRARY_PATH using:
sudo cp libgreetings.so /usr/lib
So far so good. Now you can write a driver program to test your wrapper function.
#include <stdio.h>
int main(){
 char name[20];
 scanf("%s", &name);
 int rv = hello(name);
 return rv;
}
And compile this code using:
gcc driver.c -o driver -lgreetings
And you are done.
Writing the man page
Till now you can feel like ohh yee I have my own systemcall that seems something professional. But you have missed one thing while system call development.
To write a man page you must have a fair idea related to the chapter of the man pages. Since system calls reside in chapter 2 so you need to place a manual for your system call in /usr/share/man/man2 which is the directory for chapter 2 man pages for system calls.
The file name should be something like functionName.2 , and in my case, it would be greetings.2.
Then place your manual page entries like:
.\" This is the manual page for a custom system call .\"
.TH GREETINGS 2 "August 2022" "Linux Programmer's Manual"
.SH NAME
 greetings \- Prints a greeting message on kernel buffer.
.SH SYNOPSIS
.br
.sp
.BI int ("void");
.SH DESCRIPTION
This system call is written by Ali Raza to solve this assignment of System Programming at PUCIT.
It simply prints a greeting message from a
.SH "RETURN VALUE"
return 0 on success or -1 on failure.
.SH "MESSAGE"
To be honest, systems are awesome. Try to do some productive stuff by adding or updating things in the kernel.
Happy Learning with "Dr. Arif Butt"!
The last thing is to zip this file using the following command:
gzip greetings.2
Now your man page is ready. Since the man utility reads from /usr/share/man directory for man pages, you also need to place it in this directory under the correct chapter. (For our case it would be chapter 2, the system call’s man pages).
So, to do that,
sudo cp greetings.gz /usr/share/man/man2/
Now try man greetings and you’ll find your man page.
And it’s DONE.
I hope it was an informative tutorial.
Happy Learning and of course:
Learning Linux is fun with Dr. Arif Butt ;)
~Ali Raza Mumtaz (arm)
tags: Linux Kernel - Adding Systemcall - Writing man page